Lookie here, I'm getting in one more post today! Probably the last for the week or two, thats how it goes with children. They take away your time on the internet. Could be worse right?
So my dinner plans got cancelled and I haven't gone to the grocery store yet. I always put off shopping with him because...well, shopping with a 9 month old sucks. So I have basically nothing to eat. No bread, very little amount a veggies, one egg. Hard to make something delicious. But I was wrong.
My dad sent me back to school with salsa yesterday. I LOVE homemade salsa. LOVE. I thought about doing chips and cheese, but I saw very little nutritional value in that even with the salsa. Chips and cheese used to be my go to snack. I mean come on. Its EASY. Throw a few chips on a plate, sprinkle on some cheese. Microwave for 60 seconds. Eat. Yum.
Well I realllllyyyy wanted to use this salsa and I didn't know what else to make so I grabbed the chips and went in the fridge to get the cheese, and there was some corn and black beans. Cue light bulb.
I grabbed cheese, corn, black beans, zucchini, onion, jalepeno, and tomato. All things I love that I just happened to have a little bit of sitting as leftovers in the fridge. Don't you love when things just come together like this??
I laid my chips on the plate, spooned on the corn and black beans, sprinkled on the cheese, cut up the onion, zucchini, and jalepeno, added that, and sprinkled with a little more cheese. I threw it in the microwave for a minute at a time. Each time on power three. I do this so I don't burn the cheese and have the rest cold. I think it ended up being around 3 minutes on power 3.
I then put the tomatos on top. Serve with salsa and light sour cream. It was great! And actually had some nutritional value! Score!
I just tried to add the picture I took, but my phone says that media can't be displayed. Just that picture? Right. Well I guess I will just have to make it again. Oh well :) I'll post it next time I make it!
But here are some other ideas of what you could put in this:
-avocado
-green peppers
-chicken
-ground beef
-brown rice
-green chiles
-cilantro
-lettuce
I think you get the idea! You really can use whatever you can find in your fridge!
Monday, September 24, 2012
Tilapia Ficcata and Zucchini Boats
As much as I hate cooking for one, I am trying to eat better and not eat frozen packaged meals all the time. So, alone, I am working on trying recipes that I have pinned. I meant to post this about 2 weeks ago, but I tried these two new recipes.
The first one I made was the Zucchini Boats. You can find the original recipe here.
(Pre-heat oven to 350 degrees). First crush up a clove of garlic and mix it in with some olive oil, salt, and pepper. Take whole zucchinis and cut them in half. Then, slice the bottom so its level and it doesn't roll around in the pan. Scoop out all the seeds from each zucchini. Brush the olive oil mixture on the zucchini boats.

The recipe suggested using grape tomatos. I don't believe that the kind you use actually matters, I think she suggested it because of the size. I used the tomatos from my dad's garden (aka the best tomatos ever!), and arranged slices along the boat. If you have bread crumbs, I did not at the time, sprinkle them on now. Stick in the oven for about 30 minutes.
After the 30 minutes, take them out and place your cheese, I used mozzarella, in between each tomato slice. Place back in the oven and broil until the cheese is bubbling and golden brown.
I used the toaster oven and it turned out great! I enjoyed my zucchini boats with garlic butter rice. Not the healthiest choice but it was delicious!

Gently remove your fish, deglaze your pan with some white wine scraping up the brown bits. Squeeze a half of a juicy lemon in, more if you like, a nice splash of chicken stock, a couple tablespoons of capers, and a little more butter. After it reduces a while, put your fish back in along with some sliced lemons and fresh parsley. Cook a couple minutes more just till the fish is done, and the all the flavors blend together."

The first one I made was the Zucchini Boats. You can find the original recipe here.
(Pre-heat oven to 350 degrees). First crush up a clove of garlic and mix it in with some olive oil, salt, and pepper. Take whole zucchinis and cut them in half. Then, slice the bottom so its level and it doesn't roll around in the pan. Scoop out all the seeds from each zucchini. Brush the olive oil mixture on the zucchini boats.

After the 30 minutes, take them out and place your cheese, I used mozzarella, in between each tomato slice. Place back in the oven and broil until the cheese is bubbling and golden brown.
I used the toaster oven and it turned out great! I enjoyed my zucchini boats with garlic butter rice. Not the healthiest choice but it was delicious!

The next recipe I tried was Tilapia Ficcata, this is another one I found on pinterest. The original recipe from Proud Italian Cook, can be found here.
I have always been a fan of fish, mostly in the fried form during a camping trip, but I will eat it whenever. I have only made it myself a few times, but when I found this recipe I knew I had to try. Fish is very good for you and low in calories and fat (I am still trying to lose the baby weight!).
Here are the directions from Proud Italian Cook:
"In a saute pan heat some butter and olive oil. Dredge your fish in some flour seasoned with salt and pepper. Nicely brown both sides of your fish, I prefer tilapia in this, I think it holds up really well and I like the "non fishy" taste.
Gently remove your fish, deglaze your pan with some white wine scraping up the brown bits. Squeeze a half of a juicy lemon in, more if you like, a nice splash of chicken stock, a couple tablespoons of capers, and a little more butter. After it reduces a while, put your fish back in along with some sliced lemons and fresh parsley. Cook a couple minutes more just till the fish is done, and the all the flavors blend together."
I did not have capers. It is just not something I have in my kitchen. I don't mind them and I am sure they work well with this recipe, but I did not add them or the parsley in. But this was seriously SO FRICKIN' GOOD! I loved it. I am a huge fan of lemon so this was perfect! I highly recommend trying this sometime.
Once again I had rice in my meal, this time adding the green beans! It was so good! I need to make it again!
So that is a few of the meals I found on pinterest that I have tried and enjoyed. Hopefully I will be able to try a few more in the next couple of weeks and let you know how they go!
Wednesday, September 5, 2012
Floating Picture Frames
I am almost through week two of living in my new place, and I have been continuing to work on decorating. I LOVE having pictures all over but get sick of the same old picture frames. While shopping around for picture frames a few years ago I came across the floating frames at Michaels or JoAnns and I really like them. They allow you to be as creative as you want. They also allow you to do different size pictures and patterned papers.

More ideas:
-Diploma, with pictures from graduation. If there is an achievers, or any other scrapbooking store, near you they often have different stickers and embellishments from the local high schools that you can add to it to make it look more professional. Otherwise DIY is always good!
-Baby pictures. I have been taking pictures monthly and plan to make a floating frame with a picture from each month to show how much he has changed in the first year. Smaller Pictures around the outside and a larger one in the middle with letters showing what month each picture is from.
-School Pictures, K-12. You can find paper that shows their favorite thing from that year (a sport, a cartoon caracter, pink sparkles, cookies, etc.) and frame each picture so you remember what they liked at each age.
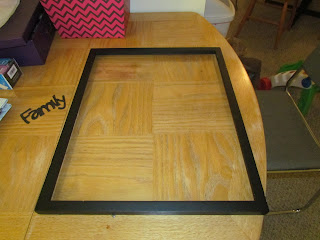
If you don't know what a floating picture frame is, it is basically just a two pieces of glass with pictures in between inside a frame. You can buy one here.

I gathered the pictures that I wanted to put in my frame, a "family" paper cut-out, some different patterned scrapbooking paper, and tape.
I arranged my paictures the way I wanted them, did any cropping I found necessary, and then when it was the way I wanted, I taped it all down. You do not have to do any taping, but sometimes the frame doesn't hold the glass close enough together and pictures slide around.

This is my finished product!
(note: The pictures I used are big! I have three 5x7s, an 8x10, and a 4x6 that I cut down. If you use smaller pictures you can fit many more!)
(If you have walls that are not white, you should think about the color when deciding on pictures or paper that you will use. If the colors are too similar to your wall, you might have a hard time seeing the beautiful pictures in the frame.)
More ideas:
-Diploma, with pictures from graduation. If there is an achievers, or any other scrapbooking store, near you they often have different stickers and embellishments from the local high schools that you can add to it to make it look more professional. Otherwise DIY is always good!
-Baby pictures. I have been taking pictures monthly and plan to make a floating frame with a picture from each month to show how much he has changed in the first year. Smaller Pictures around the outside and a larger one in the middle with letters showing what month each picture is from.
-School Pictures, K-12. You can find paper that shows their favorite thing from that year (a sport, a cartoon caracter, pink sparkles, cookies, etc.) and frame each picture so you remember what they liked at each age.
Subscribe to:
Posts (Atom)