Tuesday, January 29, 2013

Mickey Mouse Clubhouse 1st Birthday

His birthday party, about four weeks ago, went really well. We had many snacks and good friends to share with. What I wanted to share today was the cakes I made and the tool I used to help me frost. Because let me tell you, I am in LOVE with this. It was really the coolest thing. 

The frosting decorator press. Now I am not actually 100% sure if this is the one I really bought but if I was going to buy one off of amazon right now this would be the one. They are not too spendy and it is so much easier than frosting by hand or buying the store bought frosting in a tube. You know exactly what is going in your frosting and can change flavors to suit your needs. Wish I wasn't avoiding having cupcakes all the time or I would use this everyday!

Anyways. The birthday party was Mickey Mouse Clubhouse themed, since this is his favorite show. I wanted to make a MMC cake. Well I looked all over Pinterest for ideas and I didn't think I could make any of them. They were all so intricate and required the use of fondant which I have never used. I went to a birthday party last year that had cupcake pull-apart cake and I thought it was really cool. And I love cupcakes. So I decided to go the cupcake route. 

Here's what I did:

  1. Make your cake mix. I did store bought and made two batches. 
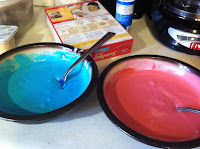
  2. Separate the batter into three bowls. (One is not pictured. It is the original bowl I am keeping white.)
  3. I made the batter the colors I wanted. I had to use a lot of food coloring to make it the blue and red that i needed. It took many drops of the coloring I used. I might try to use a different kind next time.
  4. As soon as they were the vibrant color I wanted (I wish the red was less pink though), I got out my mini muffin pan, sprayed it, and got to work. 
  5. I used a teaspoon or tablespoon to put the colors in each muffin tin. I did this at random and tried to do them each a little differently. More blue in some, red in others, and white in the ones left. When you have completed that they should look something like the picture above. 
  6. I baked them about 10 minutes and repeated the process until all the batter was gone. 
  7. While they were cooling I whipped up my frosting, I believe it was some kind of vanilla butter cream. I put yellow food coloring in it as bold as I could get it and put it in my frosting decorator press. Or what I refer to as my frosting gun.
  8. I frosted each cupcake individually using just a simple spiral. While I was frosting I started placing them in the shape of a mickey mouse head.
  9. I also mad a few big cupcakes and put 3 together to make the ears. I had to make them transportable so used 3 plates. I didn't have anything big enough to hold the whole thing.
This is for the moms who want to do something simple. The only time consuming part was making the cupcakes tie-dyed. Other than that the baking was quick and frosting with the frosting gun took less than 5 minutes to frost 2 boxes of cake worth of mini cupcakes!


I also made Colton his own little cake that he could use his whole hands to dig in. It turned out pretty good. It was a small round pyrex container and two mini cupcakes for the ears! HOT DOG! 
I can't wait to whip out the frosting gun again! Maybe for valentines day :)

Until next time,
-Amanda

Sunday, January 27, 2013

Excitement

I remember a certain post a few months back where I said my New Year's Resolution would be to blog more. HA. Apparently I forgot how crazy life gets during the holidays and the last few days of winter break. I am about to start my third week of classes (OF MY LAST SEMESTER before student teaching!!!!) and have finally gotten ahead enough where I have a minute to do a post. 

First off, we are just under seven months on the wedding countdown. I can't believe It has almost been a full year since I got engaged and started planning this wedding. I also can't believe how little I have gotten done! I truly had no idea how much it takes to plan a wedding, and how crazy life as a single(ish), student mom is. We have found some really cool, cheap ideas for things to do for the wedding. I have been working on making is as cheap as possible for my mom. 

A few ways we are doing that:

  1. Instead of hiring a band or DJ, we have decided to make a playlist, in advance, of the songs we want played and are going to put them on an iPod. My dad has all of the equipment to do the sound and we will have someone in charge of the iPod so nothing crazy gets played. I figure it saves us roughly $500-$1000, when you figure in the tip and all that. 
  2. Buying a keg, or two, and the rest with be a cash bar. I figure most of the people will be okay with a Keg of Mich Golden Light. If they aren't they can buy their own drinks. I don't think it is necessary to provide people with unlimited free alcohol especially when they don't have to drive. That bill would be incredibly high!
There are definitely more things we have planned but I can't think of them because I have something bigger on my mind!

WE PICKED OUT A HOUSE! I am beyond excited. We are one step closer to not living back and forth between both of our parents houses and just having out own place! I am so happy all I wanna do is go buy stuff and start getting it ready for MAY! But then I remember I don't have time or money. :( 

Anyways it is a 3 bedroom, 2 bathroom with kitchen, laundry, living room dining room and den. Plenty of space for the three of us to live for a while. Best of all the master bedroom has plenty of room for our King bed and other stuff! It is a beautiful thought having more than just our bed in a room! I simply cannot wait. I am scouring Pinterest for ways to decorate my home. I took a million pictures so I remember what things look like and can do before and after shots! 

Anyways, life is good this week. Excited to finish school, wedding plans, and move into our own place! AND I am seriously going to try to get on here more. Wish me luck!

Until next time!
-Amanda

Thursday, December 27, 2012

Holiday Re-cap and Birthday Party

After a very successful and busy Christmas, I am happy to say the holidays are almost over. I had a wonderful time seeing my family and friends, however, it was really tiring. It was one busy day after another. So now after baby boy's first birthday yesterday and my last Christmas party tonight I will have a few days of relaxation before heading off to the dells! Exciting! 

Anyways. For the birthday party yesterday, I used some ideas I found on Pinterest. Obviously! 

The food: Salsa Chicken. Let me start by saying: I LOVE CROCKPOT COOKING. It is just so easy. And there are so many options. This was probably my 4th time making this recipe and it is really good. The original pin brought me here to Texas Fit Chicks blog. If you are too lazy to go to the link, the recipe is:
1 cup frozen corn
2-3 boneless skinless chicken breasts
1 can rinsed black beans
1.5 cups of chunky salsa. 
(I didn't actually measure any of this. And I tripled the recipe. Roughly 7 chicken breasts, 3 cans of corn and beans, and two jars of salsa (one large & one small). It fed 12 people with enough left over for another meal for a family of 5! We made the burrito with it.)
It is super easy and super good. I like to let the chicken cook almost the whole time and then make pulled chicken. I used the entire mixture of beans, corn, chicken and salsa and put it in a tortilla with taco/burrito fixings. It was a hit. It is going in my recipe book for sure. Next time I make it I will have to take a picture!

Apple slices. Also a HUGE hit. I cut up 4 apples and they were all gone in about 20 minutes.    The original link brought me here. All you do is cut up an apple or two really thin slices and soak the slices in a bowl. In the bowl you squeeze the juice of one orange and one lemon (more if needed). Enough so that all the slices are covered. Put the bowl in the fridge for 30 minutes-2 hours. SO GOOD.

The biggest thing that happened yesterday, was my little man turning 1. ONE!?!? How did that happen? Of course I had to take a few pictures ( by a few I mean like 175??) I got the idea for the pictures I took here. I loved the idea of 3 different pictures but that go together and have a message. Here are a few of the pictures I took. 


I think I got a few pretty good shots of him. I will have to get a few printed before his party to put out. Maybe even a few wallets or sizes for people to take at the party next weekend. Thank goodness I still have some time to decide which ones I want to use. But I think these turned out pretty well. I'm still a rookie photographer but I love capturing the moments. 

I recently decided I was going to put scrapbooking on hold, since I have no time and limited funds, but I wanted to have a way to display my photos from the last year besides the 10 picture frames. So I decided to make a family yearbook. I saw a deal on amazon for photo books at Photobin.com. So i started one. I am currently 100 pages in and am only at July in my pictures. Theres more work to be done. But I am excited to get it printed! :) I will post pictures of that when it's done! 

Time to get ready for the last Christmas Party of the year! Hope everyone has had a wonderful holiday season. My new years resolution will have to be blogging more! 

Until next time,
-Amanda :) 


Wednesday, December 5, 2012

Stocking Stuffers

I was actually very excited about my first Christmas as a mom and an almost-wife. I thoroughly enjoy buying things for those I love, and have probably gone a little over board for one little boy this year. I know he is only going to be one...and he won't remember a thing. But I will. I would remember that I barely got him anything. So I got him quite a few things, and I got his daddy quite a few things too. 

Usually on Thanksgiving my family decorates the house for Christmas. With it being just Colton and I in the apartment, and very little money to spend on decorations, we only have  a few of the gel window clings in each room. Yup. That is the extent of my christmas decorations. It's actually a little depressing. So being the good mom I am, I bought stockings for us. It just wouldn't be Christmas without stockings. I didn't really think much about having to fill the stockings. I have been trying to come up with stuff to put in them, and I have gotten a few ideas from some other blogs through Pinterest. The one thing I never thought about, until now of course, was who gets to fill my stocking?? Then I realized...ME. That is so very sad. What's worse? I had more ideas of what to put in my stocking than my fiance's. 

Anyways, I wanted to make a list of ideas that I can use for years to come.

Baby Stocking Stuffers (these will be mainly boy items for the time being): 

  1. Puffs (yeah those gerber puffs, all the kids I know love them, mine is no exception)
  2. Toothbrush
  3. Sippy cup
  4. Snack container
  5. Little cars
  6. Balls (preferably ones that bounce, since those are his favorite right now)
  7. Small books
  8. Any type of snacks
  9. Socks
  10. Hat and mittens
  11. Movies
  12. Teething toys

Mommy Stocking Stuffers:
  1. Make-up (eye-liner, mascara, lip stick, foundation, etc.)
  2. Nail Polish
  3. Hair accessories (bobby pins, headbands, clips, etc.)
  4. Hand Sanitizer
  5. Hair spray, moroccan oil, heat protector spray, shampoo, conditioner, sea salt spray (anything for the hair) 
  6. Gum
  7. Toothbrush
  8. Giftcards
  9. Socks
  10. Tea 
  11. Essential Oils
  12. Travel sized stuff (mouthwash, hairspray, deodorant, hand sanitizer, etc)

Daddy Stocking Stuffers:
  1. Gum
  2. Candy
  3. Cologne
  4. Tie/bow-tie
  5. Toothbrush
  6. Gloves
  7. Gift Cards
  8. Golf balls
  9. Mini Alcohol Bottles
  10. Travel sized stuff

I am hoping to come up with many more ideas than this, stocking are pretty big! Hopefully will keep updating as I think. But it's finals time, and I should be studying (clearly that's why I am blogging!), so off to the land of productive people..I hope I'll make it there before my grades fall any further. ;) 

Until next time!
-A

Wednesday, November 28, 2012

Waffle sandwiches

As we have all been told, "breakfast is the most important meal of the day". I never was huge on breakfast, except the weekends of course, when there were pancakes, bacon and eggs, fried potatoes...cereal and milk just didn't compare. So I just didn't really eat it. Which of course meant I was starving by lunchtime and ate way more than necessary. I think the end of high school and beginning of college I began to realize just how important breakfast was. Now I eat it everyday. It really does make a huge difference in my energy levels and productiveness throughout the entire day.

Coming up with a variety of quick (and delicious) breakfasts has been an issue for me, I'm trying hard to eat healthy and lose all the baby weight. I have a lot of smoothies for breakfast, but I can only drink smoothies so many days in a row. I will get waffles to eat without syrup if I am running late, but the whole grain ones are so plain without syrup.

So I began to try different things on my waffles: cream cheeses, peanut butter, chocolate, nutella, fruit, etc. Whatever I believe will add flavor.

Well here's a winner: Peanut buter & Nutella with banana slices. YUM


I do thin layers of the Nutella and peanut butter or it is too much!


I'm not going to go and say this is low-cal or anything, because both peanut butter and nutella are high in calorie and fat, but it is quick and easy! 

2 Eggo-Whole Grain frozen waffles: 280 calories
1 tbsp Skippy Natural Peanut butter: 95 calories (I'm not sure I even use that much!)
1 tbsp Nutella: 100 calories (again probly 3/4 of tbsp or less)
1/3 banana: roughly 40 calories (less because I used 7 little slices!) 

There are so many ways to make this more healthy, but Breakfast is important! I figure I usually burn off all of breakfast playing with Colton all day :) These calories will help you jumpstart your entire day and get your metabolism going, might as well give it something to work off! 

Other ideas for waffle sandwiches:
blueberry waffles with plain low-fat cream cheese
whole grain waffles with plain low-fat cream cheese and sliced strawberries
whole grain waffles with peanut butter and honey


I will update as I come up with more ideas and try them out :) 

Happy wednesday everyone! Don't forget to eat your breakfast! 

-A


Tuesday, November 27, 2012

The holidays are upon us!

I must be the worst blogger in the world! (or the busiest student/mom ever...either way!)

I can't believe we are already into december, and the holidays are upon us. It is Colton's first official Christmas and I want it to be special, I am aware he won't remember it, but it doesn't even matter. I went through a stage back in high school and my first few years of college where I dreaded the holidays. Let's be honest, they are A LOT of work, especially when you are broke. Trying to find gifts for everyone with no money, and the awkward moment when someone gives you a gift and you haven't gotten them anything....yeah DREAD! But this year I am totally into it! Although I really shouldn't be spending the money, cause being in college with a baby doesn't leave me much money to work with, I love buying gifts! I went black friday shopping and everything! I haven't been so proud of myself in a while. 

First of all one of my favorite holidays ever...THANKSGIVING!!!! I love it. The food, the family, the last 24 hours you have money... I love it. It has always been one of my favorite holidays. Starting on Thanksgiving it is okay to listen to Christmas music and decorate for Christmas. It is such an exciting time. 

Being the organized (haha) mom I am, I am trying to not be a procrastinator this year and wanted to get christmas cards ordered and out by the first week in December. So I needed to take some pictures of Colton. This of course is one of my favorite things to do, but since the weather has gotten colder it is harder to get outside and do them. Unfortunately, I do not have good lighting for indoor pictures and prefer the natural light the outdoors offers. But there is not much of a choice anymore so I went to Pinterest of course to get some cute ideas. I had seen something a while back of a child wrapped in lights for pictures and another where a mom had used wrapping paper as the background. I really liked both of those ideas, and I searched for them again, but couldn't find them :( Anyways, I decided to combine them(? honestly I could have seen this exact thing, I don't know, but I am not trying to take credit for something I have seen!) and take some Christmas pictures! Here are a few that turned out well!


I got the santa pajamas at Target and the wrapping paper at Walmart. I set up the background by taping the wrapping paper to the floor and wall, I made sure to tape it to the floor as close to the wall as possible. And I plugged in some christmas lights, I had to borrow some from my neighbor since I couldn't find ours. I think multicolored lights would have worked well too. 

We had to sing some Mickey Mouse Clubhouse songs to get the smiles, but even the blank stare is kinda cute. Overall I think they turned out well. 

WARNING: If you do this with a toddler, they WILL eat the lights! 

Exhibit A:

He didn't actually bite them, but he likes to put stuff in his mouth. (Don't worry we were watching him closely!) 

So I got the Christmas cards ordered and I believe they are done, I will have to wait until I am back home this weekend to pick them up or have my mom do it. I can't wait to see them and get them sent out. I feel as though I have accomplished a lot already! On black friday I watched How the Grinch Stole Christmas and wrapped gifts! Yay holidays! 

Now all thats left is buying and wrapping the rest of the gifts, and planning a birthday party for my soon to be ONE-YEAR-OLD! I can't believe how fast time flies!  It has been a great start to the holiday season and I can't wait to be done with my classes to really start enjoying!

I hope everyone has been enjoying the start of the holiday season, and have had as much luck getting stuff done as I have!

Until next time...(I know that is usually a while)  :) 

-A


Sunday, October 28, 2012

Hall-O-Ween

It is 3 days before Halloween and we have been getting in the spirit for about a month now. We did the Soap Factory-Haunted Basement in Minneapolis and The Haunted Hayride at Running Aces and ValleyScare a few weekends ago. It's always fun to get in the spirit of the holidays. But my fiance's family LOVES halloween so we always have a busy October. 
 
This weekend was costume bowling and the Halloween feast. Costume bowling always requires some preparation since we have to do couples costumes, but in our case, group costumes. So we did some thinking about what we wanted to do for the three of us. Here is what we decided: 


The Flash, Superman, and The Green Lantern

Colton made a really cute little Superman. It was hard to get good pictures since he never sits still. But hey, that's like superman right?? 

Costume bowling was really fun, as always, but there was only one other group dressed up. It's a little weird when Halloween is in the middle of the week. 

But Saturday was the Halloween feast and it was super delicious! I love meals that are themed and creative. Next year I am going to try to have a more active roll in preparing the meal. Might even try to contribute my own recipes! Sounds like a lot of work right now, good thing I have a whole year to think about it. But after our delightful meal, we do pumpkin carving.

Pumpkin carving is so much work. Gutting the pumpkin, deciding on a design, actually carving. By the end, my wrists are killing me! So this year I decided to go another route. I have been seeing a lot of pins  with melted crayon and I have been trying to figure out what I could make so that I could try it. And I had seen some crayons art on pumpkin, and well, I wanted in on the fun. Here is how mine turned out...


I started by cleaning off the outside of the pumpkin with water and a towel and I dried it completely. Next, I painted the entire outside of the pumpkin white. I used blickart Acrylic paint. I just did one coat so it looked a little line-y and ghost-like (and because I didn't want to do another coat..). I let the white coat dry and painted that face with black acrylic paint. After that, I found all the old red crayons I had. I used many different color reds to give it more of a bloody feel. I used a hot glue gun to attach the crayons around the stem of the pumpkin. After that I used a hair dryer to melt the crayons. 

WARNING: Have someone hold up newspaper all around the pumpkin or you will have red wax EVERYWHERE! 

I learned that the hard way. I spent 15 minutes cleaning up little red wax droplets. Lesson learned. Anyways, it was a hit. I like how it turned out. But I think next time, I would put a knife in the pumpkin somewhere and glue they crayons around it. That would make it look like the pumpkin got stabbed and was bleeding from the wound. But here is are a few different views of the pumpkin so you can get a better look! 


You can see some of the crayons didn't melt completely. But I think it still looked pretty good for my first time! Hope I was able to give you some good ideas, or at least get the creativity flowing! 

Until next time :) 

-A